Showing posts with label DIY. Show all posts

Dec 13, 2013

DIY Christmas Gifts - Orange Honey Sugar Scrub


Another awesome and SUPER easy Christmas gift you can make in less than 10 minutes!  I scoured the internet and read about 20 different recipes and decided to combine several together and make my own.  Here it is!

You will need:
  • Containers for your scrub
  • 2 cups brown sugar
  • 1/2 cup liquid oils (melted coconut oil, olive oil, or others)
  • 1/4 cup raw honey
  • 20 drops Young Living Orange oil (or Essential Oils of you choice)
Mix everything in a bowl and scoop into containers.  I used half pint sized, wide mouth mason jars.  Tie a little raffia around the jar and there you go!  A beautiful, useful gift.

You might also check out this awesome recipe from a fellow Young Living blogger, Amy at Amy Loves It!  I do like that her recipe uses white sugar since that seems to be all over my house during the holidays :)

Want to know how to purchase your own oils? Check out this info here!


Please remember that I am a Mama and not a doctor. These things work for us and I am in love with using homeopathic remedies for health in our home and I am excited to share them with you, but please use your best judgement for your own home

Dec 8, 2013

DIY Christmas Gifts - Bath Fizzies Using Young Living Essential Oils

Here is another idea for Christmas gifts that I am super excited about - DIY Bath Fizzies using Young Living Essential Oils!

My house still smells awesome from making these wonderful little treats! 


Here is what you will need:
  • 1/2 cup Citric Acid
  • 1 cup Baking Soda
  • 3/4 cup Corn Starch
  • 1/2 cup Sugar
  • A spray bottle with water and 5-6 drops food coloring (food coloring optional, you might also try natural ways to dye the bath fizzies)
  • 20 drops of Young Living Essential Oils
  • Ice cube trays, molds, or something to give your fizzies shape
And here is what you do:
  •  Using a fine sifter, sift together the citric acid, baking soda and corn starch. Then stir in the sugar.


  •  Using your spray bottle, spray colored water onto dry mixture, stirring constantly.  If your mixture starts to fizz, you are spraying too quickly.  This was one of the most difficult steps, but you can do it!  Spray until dampened enough that you can squeeze it with your hand and it will hold it's shape.  Add your essential oils at this point and use your hands to make sure the mixture is properly mixed.


  • When your mixture is moldable, press firmly into silicone ice cube trays.  Make sure you press into the corners so that the fizzies do not break when you remove them. 


  • Ok, I change my mind, THIS is the hardest part.  Wait overnight before you take your fizzies out of the trays.  If you are even half as impatient as I am, you have already tried removing one, haha.  I successfully got a few out a couple hours after making this recipe, but when I took the rest out this morning, I was shocked at how much easier it was to remove the hardened fizzies.


Package your fizzies in fun containers.  The one above I found at World Market.  I also used Mason jars and other containers. Tied with some pretty baker's twine, this is a wonderful gift!


I used Young Living Peppermint oil because it would be wonderful for sore muscles to soak in a bath with peppermint.  There are hundreds of other combinations you could use!  Lavender for a soothing bath, RC, Peace and Calming, Joy... try this recipe with your favorite Young Living essential oil!

Want to know how to purchase your own oils? Check out this info here!


Please remember that I am a Mama and not a doctor. These things work for us and I am in love with using homeopathic remedies for health in our home and I am excited to share them with you, but please use your best judgement for your own home


Dec 7, 2013

DIY Christmas Gifts - Body Butter with Young Living Essential Oils

Let's just put it out there.  Money is tight.  But that doesn't mean that that I don't want to give amazing, thoughtful gifts to the people I love.  Over the next week or so, I am going to share with you a few of the DIY gifts I have been making that I am totally in love with.  I would be so thrilled to get these myself, so I know they will be a hit.  If you are on my gift list, please forget you saw this post ;)

So, tonight, I will share with you how to make amazing body butter with coconut oil and Young Living essential oils.

Here's what you need:


  •  2 cups organic coconut oil - I used Trader Joe's Organic Virgin Coconut oil.  It is a good price, and good quality.
  • 1/2 cup fractionated coconut oil (coconut oil in it's liquid state)
  • 20 drops Young Living Essential Oils (I used Melrose and Lavender)
  • Container for finished product
Let's talk about the container for a minute.  I put mine in a few different containers, but aren't these cute:


(click the image to see the item on Amazon)

I think they would be perfect because of the wide mouth to dig out the body butter when you are getting low.

Here's what you do:
  • Melt together your solid oil and your liquid oil (coconut oil was the easiest for me to use, but you can choose other oils as long as you have a solid and a liquid)
  • This is the perfect project to do on the icy days we are having in Dallas because you need to bring the oils back to a semi-solid state once they are combined.  I melted mine in a Pyrex measuring bowl then placed them outside, covered with a dish towel, while I worked on another project.  Don't rush this step.  If the oils are liquid, they will not whip.
  • Put the semi-solid oils in your stand mixer (or use a hand mixer in a pinch) and whip the oils until they are the proper consistency.
  • Add Young Living essential oils and continue mixing.
  • Spoon body butter into your containers.  Mine made 18-20 ounces in case you were wondering for planning purposes.
  • Tie on a pretty bow and give as gifts!

I wrote a little note that reminded the user to store in a cool place - when coconut oil is warmed, it will turn liquid again.

Just from making this, my hands are super soft!  I am keeping one for myself and can't wait to add these to gifts for my kids teachers, friends and family.


Want to know how to purchase your own oils? Check out this info here!


Please remember that I am a Mama and not a doctor. These things work for us and I am in love with using homeopathic remedies for health in our home and I am excited to share them with you, but please use your best judgement for your own home.

Dec 5, 2013

Welcome Winter


In north Texas this weekend, we are expecting a thrust into winter with ice and sleet.  Ice is not my favorite - if we are going to have winter precipitation, I would much rather have light, fluffy snowflakes.  Doesn't the thought of snow make you feel nostalgic, happy, excited, and childlike?  I'm not talking about the months of snow that my brother and sister in law experience in Iowa- I'm talking first snow.  Let's welcome winter and make a cute craft all at the same time!

All you need is newspaper, masking tape and scissors.  Get your kids to help you and teach them how to make smaller versions as well!


Step 1 - lay out newspapers and tape together using masking tape.  I used three sheets of newspaper high and three wide.  I found it worked well to take the three in a row together, then tape my three completed rows together.  When you have your newspaper taped together, fold in half on the diagonal and trim to square.

Step 2 - Fold in half on the center line again (see photo above).  It should now be folded in quarters.

Step 3 - Fold in half on the center line again (see photo above).  It should be folded in eighths now.

Step 4 - This is a photo showing what your snowflake should look like now - folded in eighths.

Step 5 - Draw where you want to cut your snowflake.  Make sure you do not cut the entire length of either of the folded sides.  You can easily cut things OUT of the sides to make a cool design.  Check out Pinterest for awesome templates you can use, or draw your own!

Step 6 - Cut out your snow flake.  This step will probably require adult scissors, though feel free to welcome your kids to try on their own with safety scissors if they are old enough.


And there you have it, a giant paper snowflake!  So many possibilities!  This one is going in the display case at the school where I teach along with student artwork.  Looking for festive ways to bring some Christmas spirit to school.  I'd love to see your snowflakes!  Feel free to post your photos on the Mama Marcie facebook page :)

20 more days until Christmas!

Nov 1, 2013

Thankful, Day 1

It is so easy to get bogged down in the daily grind - the dishes, the laundry, the carpool - seems to be never ending!

I propose we take 1 month - just one (though maybe it will be contagious and sneak into the other months, too) - and just be thankful.  Look for something good in every single day.  Seek our our blessings, not our curses.  And in return, possibly see a change in ourselves, in the way our home runs, and in our attitudes.  *fingers crossed*

When we were little, my mom was a crafty genius (still is), and always had some fun ideas to get us kiddos involved.  One of the things that sticks in my mind the most is the Thankful Turkey on the pantry door.


This is ours so far this year.  Every day, make it a routine to write down one thing per person that you are thankful for.  You can do it at dinner time or maybe at night as part of the bedtime routine...

Now is the time to break out that construction paper!!  Let your inner 7 year old out and have FUN creating a memory for your kiddos.  For the center shape (the turkey body), I used butcher paper because I had it laying around.  You can also use a sheet of poster board.  I made it easy on myself and folded all my shapes in half so that they were symmetrical. 

Here are the shapes you need:

Be creative!  Use whatever colors you want.

For the beak, I folded the triangle in half, then cut a tiny slit on the side opposite the point and folded about a quarter of an inch down so that I would have a way to glue it to the body.

My girls are totally into this already.  Izzy wanted to do all of them tonight - she is already looking forward to tomorrow night's feather!  Even daddy got in on the action!


Oct 6, 2013

DIY Thieves Foaming Hand Soap

Ah, foaming hand soap.  I love this stuff.  But not as much as my potty-training two and a half year old daughter.  Since she started potty practicing, we have gone through 2 bottles of foaming hand soap in the bathroom.  I have 2 problems with this:  1. It's expensive!  and 2. What you put on your skin goes in your body.  Have you looked at the ingredients in your soap lately?  Wouldn't you rather know exactly what you are slathering all over your hands?  I know I would :)


So, here is an awesome recipe for a Do It Yourself Foaming hand soap using Young Living Essential Oils.

What you will need:

- A foaming hand soap dispenser.  You can reuse one that you already have or you can purchase a new one.
- Liquid Castile Soap (I used Dr. Bronners)
- Vegetable Glycerine or Vitamin E oil
- Young Living Essential Oils


Here's how you do it:

1.  Add 2-3 Tablespoons of Liquid Castile Soap to your soap dispenser.
2.  Add 1/2 tsp vegetable glycerine or a few drops of vitamin E oil.  This step is not necessary, but I believe you will find the soap drying without this ingredient.
3.  Add 5-6 drops of Thieves oil or any oil combo of your choice.  More on this in a second.
4.  Slowly fill your container with water.  Be sure to leave enough room for the large pump (ie:  don't do what I did the first time and fill it to the top and then have a huge puddle on your kitchen counter)
5.  Gently shake to combine all ingredients.

Why I chose Thieves:

Thieves Essential Oil has been highly tested for it's cleansing abilities.  All this, plus it smells awesome! 

Wonderful Smelling Options:

Lemon

Lemon and Lavender

Lemon and Peppermint

Peppermint and Lavender

Purification

Cinnamon Bark


Happy Hand Washing!

Want to know how to purchase your own oils?  Check out my informational page here!

Sep 14, 2011

Well With My Soul

 "For I have learned to be content whatever the circumstances." Phil 4:11

A lesson learned over and over and over again... or maybe I just haven't actually learned it yet. I'm all about having little reminders through my house of the woman I want to be.  This one is above my mantle.  

I found an old piece of chip board in the back of my classroom that had seen better days - it was stained, painted on, and just generally unusable for our art purposes in the class.  I didn't want to throw it away, so I thought I would make something out of it.  (symbolic, no?)  So, I printed off the letters on my computer and drew them with Pencil.  Then I used grey acrylic paint and painted around the letters.  It only took me about half an hour, and I love the look of it above my mantle.

Sep 13, 2011

Goin to the Chapel and We're...

As I have mentioned in a previous post, my sweet cousin Katie is getting married in November.  Saturday, my family and I threw her a wedding shower at my house.  I had such a fun time planning this party.  I am not going to lie, I spent HOURS on Pinterest finding ideas and planning every detail.  This was pretty much a Pinterest party.  Here are a few photos by Lisa Pittman of the event, along with links to some of the projects I created.

I wanted this party to be as colorful as possible.  I think we succeeded!  This is a photo of the table.  At the end of the table, you can see one of the decorations I made.  I made several tissue paper poofs and used them around the living room and one one the table.  Also on the table are Garlic Chicken Puffs, made by my aunt Jerri.
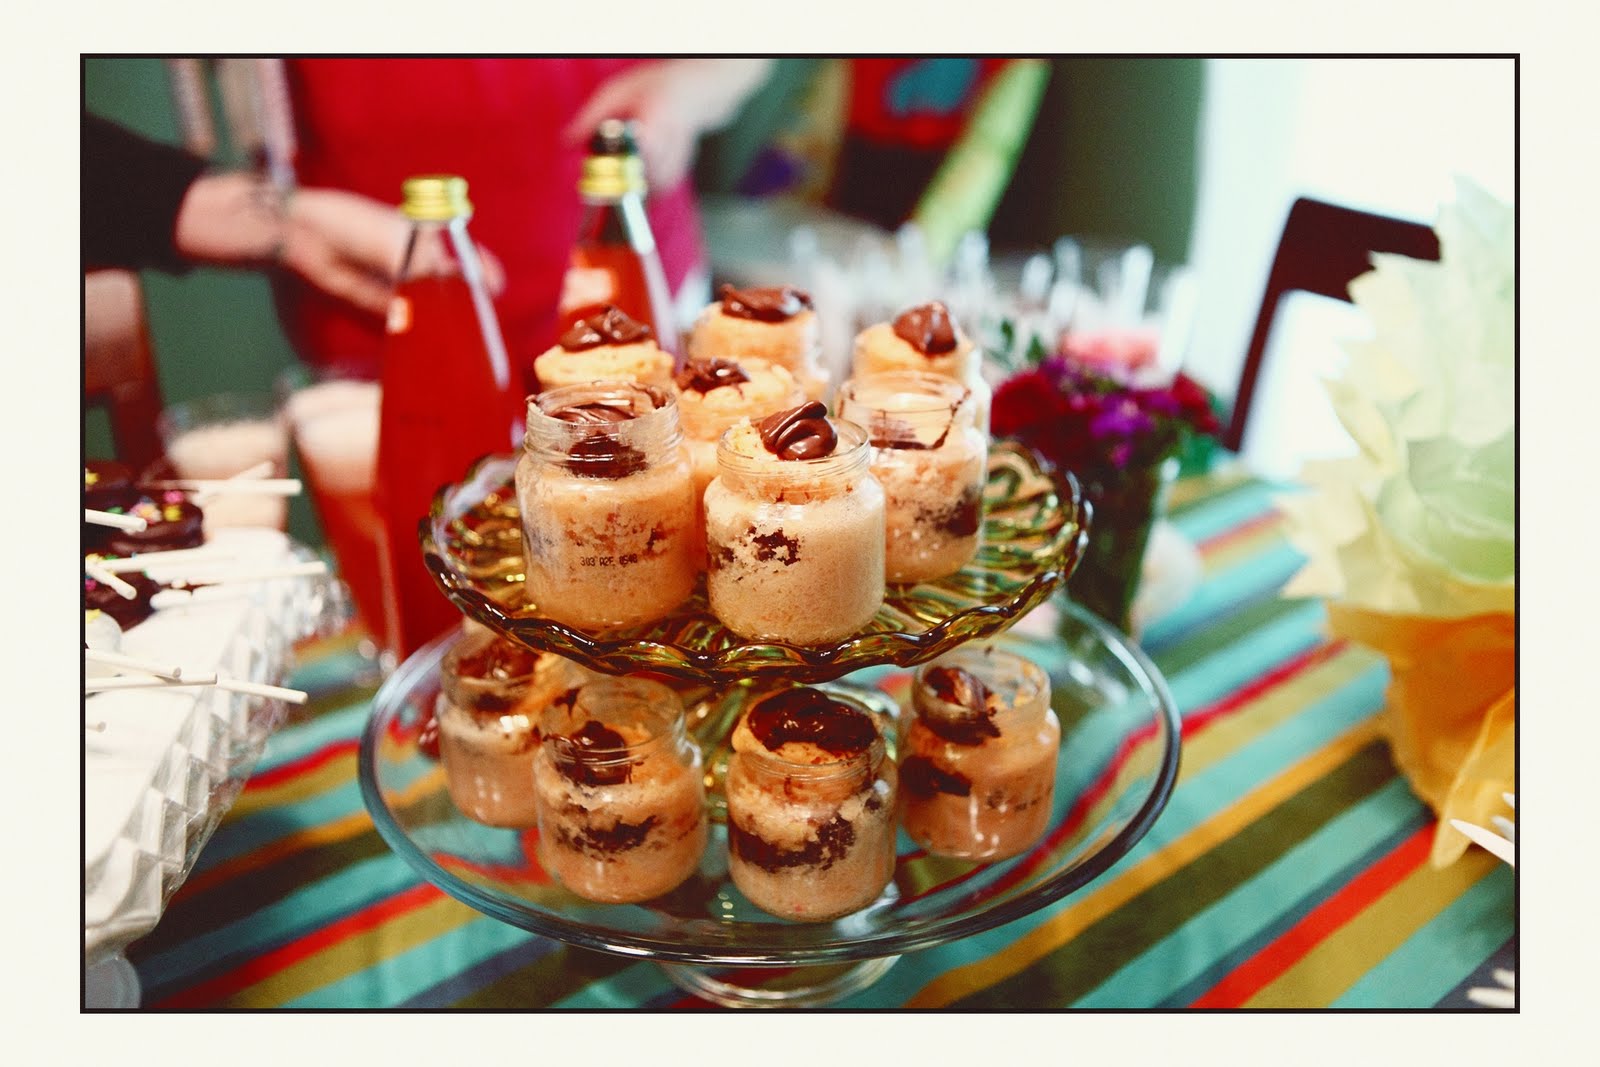
Here we see a photo of Nutella Cake in a Jar.  I was in charge of this particular project, and at first I was worried that this was going to be an epic failure, but after only a few failures, I finally got them to work.  The recipe on Pinterest calls for a pint sized jar, and I used baby food jars instead, which needed only 45 seconds in the microwave.  I was really worried that they were going to stink, but apparently they were awesome, because they were all gone and neither me or my Aunt got one at all!

One of my favorite food items at the shower were mini Pop Tarts on a Stick, made by my mom.  They were so good!  And apparently pretty easy, though the strawberry jam did seep out a bit around the stick.  I like that you can personalize these with sprinkles that would match your decor.

Sometimes the simple things are the things that turn out to be quite beautiful.  My aunt and I were trying to figure out what to do for beverages, and at a shopping trip to Aldi, she found sparkling juices which turned out to be the perfect accompaniment to our colorful food.


I hate the idea of games at showers, but we did have 2 things that gave Katie something to take home to remember the shower, and also got everyone involved (one intentional, and one not).   In the invitations, I sent a recipe card to everyone invited, asking them to write down their favorite recipe to share with Katie.  I was happily surprised that almost everyone brought theirs back for her!  I think this is a great thing to do at a kitchen shower.  One of our cousins even brought all of the kitchen utensils necessary to make her recipe as her gift.  I thought that was a great idea!
 Our other "activity" was quite unintentional, but ended up being hilarious and crazy fun.  I found a great wedding shower card for Katie at Border's book store - 60% off even!  Do you remember the old fish fortune tellers that would curl or flip based on the temperature of your hand?  Well, this was the same idea, only with a groom instead of a fish, and the fortune was about your relationship.
We all laughed so hard at the fortunes of the married women in the room.  Mine was "true love forever."  Big shock there ;)  The ones that were so funny were my cousin Charla, whose "groom" flipped  over about 3 times, meaning "I didn't know you were so... umm... adventurous." And my sweet Meme, who's groom flipped over as well.  She was a little embarrassed because we laughed so hard some of us were in tears.

And of course, as always, my daughter was a little ham and had a great time.  She is going to love her birthday and Christmas - ripping all the paper and playing with the boxes!

All in all, I think the shower was a smashing success.  So happy for you, KK!


Sep 4, 2011

Shower Invitations

My cousin, Katie, is a wonderfully unique individual.  We are close in age, and though we grew up in different cities, we have always enjoyed spending time together.  I am so happy that she has found Hunter, the man she will marry at the end of November this year.  To celebrate their upcoming nuptials, my family and I are throwing Katie a wedding shower at my house in next weekend.

I think I would like to be a party planner - especially with the help of Pinterest.  I adore planning a menu, making decorations, and planning all the details of a party.  And I love having parties at my house!

For this party, I felt like it was a good time to completely redo my living room ceiling, paint and redecorate - ok, ok, I didn't actually feel that way.  My ceiling dictated that I must do that because of a huge AC leak in my attic that soaked through the ceiling in our front room.  But now, the living room is a beautiful shade of grey and ready for me to nest, hehe.  I can not wait until the ceiling is done tomorrow so that I can get in there and get started!

Anyway, back to the shower.  I struggled for weeks with what theme to go with for the shower.  I had thought about doing a Vintage themed shower with aprons and depression glass and all that girlie stuff, but that just didn't seem to fit.

During a light bulb moment, I decided against a "theme" persay, and went with color inspiration.  Black, white and bright colors.  Seemed to be the perfect thing for Katie, and I had all sorts of ideas for a fun, non traditional shower.


More on the details after the event, but I wanted to show you the invitations I created.  This was so easy!  I used black card stock, a white opaque marker, a yellow paint pen, bright colored paper, and a stamp I found at Michael's for a dollar!  I had fun making these and I am already brain storming how to make the invitations to Isabel's first birthday!

Here's a sneak peak at the shower invitations:

Aug 17, 2011

30 Day Photo Challenge

Tomorrow, I plan to embark on the 30 Day Photo Challenge I discovered on Pinterest. Take a look at the details:

Any of my readers want to take part in this challenge with me? I would love to see what you come up with, link your photos to my post, and have some people to keep me going!

Who's in?

Aug 15, 2011

Be Present

Like I've said before, I don't think I am deserving of any Mom of the year award, but I definitely strive to be the best mom I can be. It has struck me pretty hard lately how fast Isabel is growing and changing right before my eyes and I do not want to miss one second of it. So, I had two goals with the project I did this evening - our den was in need of some pizazz, and also, I wanted a visual reminder to be here, in the moment, absorbing every new thing Isabel learns and all those amazing facial expressions she has. Put away the iPad, check my email later, take my eyes off the tv, and really live in the moment.

Be Present.
This is a very simple and inexpensive project. I do not believe that there is such a thing as an uncreative person (hmm, maybe I'll write another post about that sometime), but if you are one of the people that subscribe to that lie, even you can do this project!

You will need:

A frame - mine is 8"x20" and I found it a Michael's on sale for $4.99
Large white piece of thick paper
Exacto knife
A print out of the letters
Pretty paper - I used papers I found on sale for 15 cents a sheet
Tape
First, print out the letters you want to use. I had to use two printed pages to get all my letters... Kinda like we did with the banners we printed to use at birthday parties when we were 8.

Tape the pages together if necessary, and then tape these pages to the white paper.

Using the Xacto knife, carefully cut out each letter. For letters such as the Uppercase R, make sure you save the hole in the middle to use later.

Chose what paper you'd like to use and tape it on to the back of each cut out letter (see the picture above). Use either a small piece of tape or a glue stick to adhere the center pieces of the letters with holes on the front of the paper.

Put your creation in the frame and there you have it! Awesome art and a great reminder every time you see it to be present and in the moment.